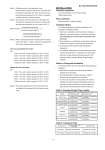
No. SS2-VRX100-0100 - 4 - (Note 1) Although accuracy is not guaranteed when measurement is performed with the flow rate range from the minimum measurable flow rate to the minimum flow rate that ensures accuracy of ±1% of rate, it is possible to obtain output of a sufficient accuracy. (Note 2) The accuracy obtained using the flow rate range from the minimum measurable flow rate to the minimum flow rate that ensures accuracy of ±1% of rate is ±2% F.S. kinetic viscosity= .. 103 Process fluid density (kg/m ) process fluid viscosity (cp) 3 Process fluid density (kg/m ) Process fluid viscosity (Pa s) 3 .. .. (Note 3) When a process fluid kinetic viscosity is between values listed in the Table 1 or Table 2, calculate an approximate flow rate by using the following expression. Size 25mm Flow rate = kinetic viscosity X 1.7024 + 0.0214 40mm Flow rate = kinetic viscosity X 2.2206 + 0.0009 50mm Flow rate = kinetic viscosity X 2.5014 + 0.0977 80mm Flow rate = kinetic viscosity X 4.5962 + 0.0733 100mm Flow rate = kinetic viscosity X 7.3929 + 0.1888 Size 25mm Flow rate = kinetic viscosity X 0.2834 + 0.0153 40mm Flow rate = kinetic viscosity X 0.4978 + 0.0272 50mm Flow rate = kinetic viscosity X 0.6924 + 0.0167 80mm Flow rate = kinetic viscosity X 1.1914 + 0.1053 100mm Flow rate = kinetic viscosity X 1.9376 + 0.276 (Note 4) The optional calibration of ±0.5% of rate accuracy is only applied to the process fluid of tap water or pure water. INSTALLATION Electrical connection G1/2 internal thread, 1/2 NPT internal thread, CM20 internal thread Pipe connection Wafer connection, Flange connection Installation Notes .. The following guidelines should be considered when selecting an installation location: 1. Install in any orientation, either horizontally, vertically, or diagonally, as long as the pipe is always filled with liquid. For submerged use, avoid contact of converter case with water. 2. When installing on a vertical pipe, ensure that the process fluid flows from bottom to top and always fills the pipe. 3. Avoid locations that experience large temperature fluctuations. 4. Use supports. Although the flowmeter possesses a good vibration-proof structure, it is advisable, to protect piping and joints, to keep vibration and shock below 9.8 m/s2. Install in a location having sufficient wiring and piping clearance. Notes on Piping and Installation The following points need to be considered during piping and installation: 1. Match the flow direction of the fluid with the direction indicated on the flowmeter. 2. Install straight pipes (of lengths specified in Table 4) upstream and downstream of the flowmeter. 3. To ensure an accurate flow measurement, the internal diameter of the pipe connected immediately before and after the flowmeter, should be of a size equivalent to or larger than the internal diameter of the flowmeter pipe. Table 4. Required Straight Pipe Lengths Piping for the Upper Stream Straight Pipe Length for the Upstream side Straight Pipe Length for the downstream side One 90.. bend A minimum 23 straight pipe diameters A minimum 5 straight pipe dimameters Two or more bends on the same surfaces A minimum 25 straight pipe diameters A minimum 5 straight pipe dimameters Two or more bends on a different surface A minimum 40 straight pipe diameters A minimum 5 straight pipe dimameters Reducer A minimum 15 straight pipe diameters A minimum 5 straight pipe dimameters Expander A minimum 27 straight pipe diameters A minimum 5 straight pipe dimameters Gate valve A minimum 15 straight pipe diameters A minimum 5 straight pipe dimameters Pump, control valve A minimum 40 straight pipe diameters A minimum 5 straight pipe dimameters Table 5. Connection Pipe Nominal size Internal Diameter of the Flowmeter Connection Pipe 25 to 50mm Equivalent to schedule 40 Schedule 40 or greater 80 to 100mm Equivalent to schedule 80 Schedule 80 or greater